Wednesday, December 15, 2010

Christmas Decorating - Throw pillows

My final Christmas decorating idea is to add festive throw pillows to your family room or living room.  This is an easy way to add holiday spirit in unexpected places.  Decorating for the holidays can be done in layers taking advantage of all the surfaces in your home.

The family room shown in these pictures, I have added green and red pillows on a neutral sofa.  The pillows have a satin sheen to them which gives the room a subtle festive look.  The colors coordinate with the room's color scheme which makes it possible to put the pillows out early in the holiday season and you don't need to put them away until well after the new year.


The leather sofa in this picture has a hint of the holidays with a brown and green pillow and a red throw behind it. The petals on this pillow has a lot of texture and adds interest to this dark sofa.  All the pillows above were purchased at TJ Maxx in the pillow section not the holiday section.  I searched for the colors I wanted to use, not what the store deemed holiday decor.


I have included some other pillow designs to help you choose the right pillows for your holiday design.  The beaded white pillow adds sparkle and shine.  The red, green and brown pillows are a more contemporary options.  Have a great holiday season.


Dotty Wyman is the principal designer at www.dottywymandesigns.com.

Tuesday, December 7, 2010

Christmas Decorating - playful window

When decorating for the holidays you want everything to look perfect, but don't forget to have a little fun.  I have created a simple treatment for this kitchen's box window that everyone will enjoy, especially the kids. 


These handmade inspired plush decorations look great grouped off to one side of the window looking at a simple pine tree. Each of the three characters I put together has similar colors, but they are not exactly the same. The reindeer came from a different collection and it adds some interest and keeps the grouping from looking like it is a matched set. Also, notice each of the characters is a different height. Grouped decorations always seem to work better when each has a different height.  The little Christmas tree off to the left fills the remaining space of the large window sill.

Another idea for this group of characters is to put them on your fireplace.  You could put the trio on either end of the mantel and hang your stocking in the center.  Adding some burlap fabric, gathered up in places would add to the rustic feel of this decoration as well.

Keeping things simple keeps the stress away.  These whimsical decorations make me smile every time I look at them.  I guess that's why I put them on my kitchen window.  They were not expensive and very accessible.  The characters are at T.J. Maxx and I got the tree at Target.

Have fun.


Dotty Wyman is the principal designer at www.dottywymandesigns.com.

Friday, December 3, 2010

Christmas Decorating - Table Center Piece

The holiday season is here and we are all pulling out our decorations from last year.  Some things we like and other items we vowed not to use again.  I thought I would give you a few of my ideas for holiday decorating over the next week. 

One of the easiest ways to decorate the kitchen or dining room is to add a center piece to your table.  Actually, you cold do it on a large coffee table too.  This provides a lot of holiday impact for the room without lots of little things that clutter.  Everyone's eye is drawn to your center piece.  In the picture above, I have arranged 3 large, but varied sizes of urns on a velvet throw for a dining room table.  The urns have the look of mercury glass that is chipping away from the sides to give them an aged look and a little sparkle.  The velvet throw has beads sewn to the edges, also giving them a little glitter.  I have gathered up the throw to create a circle of fabric around the urns in the center.  This creates some movement and places for the light to reflect and it also allows you to see your table

  
Once you have found one or three objects (always good to work in odd numbers) and some type of fabric, throw, table cloth, etc... you can create your center piece in a few minutes.  Place the throw on the table and center it flat.  Now arrange the objects in the center of the table, most likely in a triangular shape (if using three things).  Finally, push the sides of the throw/fabric toward the center without covering the bases of the decorative pieces.  This creates the crinkles and folds of the fabric and your center piece is complete. 

Finding items to create the center piece can be a challenge, but just keep your eyes open.  The objects you select do not need to be in the Christmas section of the store.  They just need to have a little shimmer or shine and be large.  The throw or fabric could be what makes the center piece more appropriate for the holidays.  Also, try using items you already own and mix them with velvet or silk.  The urns I selected are from Christmas Tree Shop and the velvet throw is from Pier 1.  Try to experiment and have a good time.  Remember it is only temporary.

Dotty Wyman is the principal designer at www.dottywymandesigns.com.


Monday, November 22, 2010

Student Art Sales

This weekend I went to the School of the Museum of Fine Arts sale with a couple of friends.  The first floor gallery featured student paintings and other artwork that were for sale to the public. Large framed canvas painting, as well as, practice sketches were displayed on every wall.  In addition, many items were unframed and in stacks to be viewed by patrons.  The artwork was unique and original and that was reflected in the price.  Most of the framed artwork pieces were $1,000 or more.  The other unframed sketches, watercolors and other medium pieces were under $900 and many ranging between $250 to $550.


Going to art galleries can be intimidating and I thought this was an opportunity to checkout many new artists at one time.  There was a lot of artwork to choose from and there were many people milling around to keep you company.  I'm not sure you if you would be choosing artwork from the next famous painter, but this art show provided an opportunity to see what the future artists are doing and thinking right now.


The artwork pieces in your home should reflect your interests and what is appealing to your sense of style.  Not all of it needs to be expensive.  Events like a student art sale are great opportunities to find original pieces to display and add uniqueness to your home's decor.

The School of the MFA art sale is over for this year, but there are others at the RISD alumni sale (12/4) and Massart Holiday Sale (12/6 - 11).  Consider checking out a student art sale for a one of a kind art piece for yourself or as a gift.

Dotty Wyman is the principal designer at www.dottywymandesigns.com.

Wednesday, November 3, 2010

Mixing patterns for a sophiticated room design

I love walking into a space that has an interesting mix of patterns.  If done well, the room will feel cohesive and everything will blend together.  This doesn't mean everything is an exact match.  Surfaces with pattern could include the furniture, walls, floors, window treatments, pillows and table cloths.  Mixing patterns within one room can be intimidating, but worth the risk.


There are 5 different patterns in this living room

The key to mixing patterns is to make sure the scale or size of each pattern is varied.  It is easier to mix different types of patterns, so they are not competing with each other.  For example, a very common mix of patterned fabrics is the large scale floral, the stripe (or plaid) and a small repeating pattern, such as a pin dot or diamond pattern.  By using three patterned fabrics you are able to introduce additional colors in either a bold or minimal way.  One way to make this combination even more interesting is the select fabrics made of different fibers.  Mix flat fabrics like cotton and linen with those that have a sheen such as silk or polyester silk and if you are feeling daring throw in a chenille for texture.  
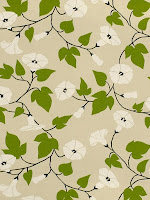


Bold pattern to be
combined with
complimentary patterns
 to the right


Another important aspect of mixing pattern is determining how much of a pattern is actually appearing in the room.  A wildly bold fabric is not going to over take a room if it is only on one or two pillows.  On the other hand, a very small scale print used for draperies may disappear if you step away from it.  Putting the right pattern in the right place works to create the desired design effect.  When fabric samples are all the same size it can be difficult to see that a bold print will not take over a space used sparingly.  Using each chosen pattern in varying amount throughout your room creates interest and balance, giving your room appeal.

The neutral backdrop of the rug, sofa and the sheer panels  allows the
pillows and small chair to be dramatic focal points

I have focused on fabrics, but I don't want to forget patterned rugs and wallpaper.   Both add beauty and warmth to a room and need to mix cohesively with the fabrics too.  The same rules apply, mix patterns of different scales.  An oriental rugs can have an intricate pattern that blends well with a large scale print for drapery panels.  On the other hand, a large patterned oriental rug would work better with a large or small scale repeating pattern, such as a Greek key or lattice pattern.   

Red and white in varied patterns around the room.

Try mixing some patterns for your next interior design project.  You will be able to exceed your original expectations for the room.  Remember you can start out with a couple of patterns and layer on more later on as you figure things out and become more confident.

A more subtle mix of fabrics

Again 5 different patterns in one room and it looks
well designed.
Please let me know what other interior design areas you would like to learn about.

Dotty Wyman is the principal designer at www.dottywymandesigns.com.

Wednesday, October 27, 2010

Kitchen remodel in progress

I have been working on a kitchen redesign for the past several weeks.  The kitchen is spacious and has a good functional layout.  Since the cabinetry is also in good shape, we decided to add new architectural details and then paint the cabinets instead of replacing them.  Included are some pictures of the kitchen prior to starting the remodel and some of what it looks like currently in mid project. 

Dated oak cabinetry with limited architectural details

Space around refrigerator doesn't look custom designed

Gray tile floors are cold and dark feeling

White tiled counter top is bland and dated


This project is not yet completed, but I wanted to show you the changes that have already taken place to this redesigned kitchen.  Architectural molding has been added to the upper and lower cabinets, then painted and glazed, new granite counter tops were installed and hardwood flooring replaces the gray tile.

Crown molding added to the top cabinets and molding is added to the island and end of upper and lower cabinetry
 
Molding added to the sides of the upper and lower cabinets, then painted white and finished with a taupe colored glaze.  The glaze settles into the molding details allowing them to stand out.


Another angle to see the moldings added to sides, tops and bottoms of cabinetry

The black pearl granite adds a striking contrast to the white glazed cabinetry

An overall view of the crown molding built up on upper cabinets for a dramatic affect

The floors are now warm and inviting

The next steps for the cabinets are to finish glazing the cabinet boxes, hang the newly painted and glazed doors, add feet to the bottom cabinets and some additional base molding.  A decorative marble tile back splash will be added and the walls painted.  Please check back for updates to this design project.

Dotty Wyman is the principal designer at www.dottywymandesigns.com.

Tuesday, October 19, 2010

Interior Designer is also your project manager

I wanted to provide some specific information about what types of services an interior designer can provide to you.  Most people hire an interior designer with the understanding that the designer is able to design an interior space.  They will select the fabrics, furniture, design the layout, paint colors etc...  This is all true, but we also offer the important service of project management for creating your new room.  This is an essential part of designing and executing any interior design plan.

The project management aspect of designing a room starts right at the beginning of the project.  The designer has resources available to identify trades people who do excellent work, are reliable and are conscientious.  In many cases the interior designer has worked with them or has a strong recommendation from a colleague.  These resources are extremely valuable to the success of your design project.  Once a project is underway, the designer will coordinate the trades people through each phase of the project.  This includes scheduling, follow up calls and review of the work being done.  These responsibilities are critical to having a successful design.  A client who does not have much time to spend researching trades people will rely heavily on the designer for their project management skills.

Currently, I am working with a client remodeling her kitchen.  Both she and her husband work and are not able to spend much time getting into all the details of the project.  They are relying on me to coordinate with the granite fabricator, tile showroom and tile installer to get all the work completed in their new kitchen.  This particular client had already lined up the hardwood floor construction, so it is my responsibility to coordinate the tile and granite installation with the floor installation.  The designer can also work with trades people a client may have worked with in the past.

Using a designer does not necessarily increase the cost of creating a custom designed interior space.  A designer's expertise can put our clients in contact with the right trades people, select a design that is functional and well thought out and keep a project on track.  Saving the client from selection mistakes, timing delays and providing product information.  A job well done by a designer includes the desired interior space, which is completed on budget and timely.

Dotty Wyman is the principal designer at www.dottywymandesigns.com.

Friday, October 8, 2010

Shopping at the Ikea Marketplace

If you need a few things to add some excitement to a tired looking room, try Ikea in Stoughton.  I was looking for some large candle pillers for two outdoor lanterns and I found them at the Ikea Marketplace and a lot more.  The white candle pillars ranged in height from 4" to approx. 18" with a 4" diameter.  A cluster of  these large candles could make a great center piece for a coffee table or for the holidays on the dining room table.  The price point was great too.  The 9" candle was only $10 compared to $20 at Target (granted theirs is scented). 

The other things I saw while I was there were some great healthy looking house plants.  Replacing a sad looking indoor plant with a new one always makes a room look fresher.  The large floor plants were $18 to $25.  If you are not into keeping plants alive there are some great bundles of twigs and silk flowers.  Not a huge selection, but the prices were very reasonable.  Which is important since it usually takes a lot to fill a large floor vase.  I think I will be going back for a bundle of the 6' twigs for $14.99.

Another thing I like about Ikea is their price on accessories.  You can buy multiples and not break the bank.  Multiple vases for a table scape, multiple frames for the walls and fun glassware for a party.  I realize Ikea is very contemporary, but many of the accessories are neutral and can be mixed with your current room style.  Most of the examples of this are what I have mentioned such as the botanicals, candles and glassware.

Ikea is a great option if you want to experiment with a look or if it is just temporary, for instance the holidays.  This store makes it easier to be creative, since you know it won't be outside your budget.  Check out Ikea if you have a chance.


Dotty Wyman is the principal designer at www.dottywymandesigns.com.

Tuesday, October 5, 2010

Where to buy lamps right now...

Is it challenging for you to find beautiful lamps to decorate your rooms?  I know it is for me.  I have been shopping for a client recently and one local store had lamps I really thought worked well in their home.  I thought I would share what I learned.

Crate & Barrel Furniture currently has a great selection of stylish lamps.  I like that there is such a variety in the materials from which the lamps are made. They include ceramic, glass, stone, hammered metal, nickel and even natural elements such as wood.  These lamps have matching shades that are good quality and no plastic risers just below the lamp halo.  The pricing of the lamps is between $100 to $250.  The styles are traditional to contemporary and there is a large varied selection.

If you are searching for lamps for a newly designed room or you just want to add new lighting to shake things up, I think you will find some good options at Crate & Barrel.


Dotty Wyman is the principal designer at www.dottywymandesigns.com.

Wednesday, September 29, 2010

Kitchen makeover on a budget - decorative accents

Now that you have made one or a few updates to your kitchen it is time to put on the finishing touches.  Important decorative items that will add beauty, comfort and style to your kitchen are fabric, paint color and artwork.  These choices will make your kitchen unique and inviting.

 Kitchens have many hard edges that can use some softening.  These can easily be softened with the use of fabric on the windows or furniture.  Window treatments add color on the walls and softens window frames.  Upolstered furniture mixes in with the wood cabinetry and tables in the same way.  Fabric is also used to bring in additional colors for accents.  When kitchens are designed many of the expensive surfaces such as granite counter tops, cabinets and floor are kept neutral.  This is done to increase the longevity of your kitchen.  Fabrics can be added and removed more easily and with less cost.  It allows you to take a risk with color in order to keep your kitchen fresh and updated.  Even small dish  towels can add a shot of color with very little cost.


I usually try to select the paint color after I have selected the fabric.  You hate to exclude a fabric you love, because it doesn't match the paint.   You can always find a matching paint color.  It can be done with paint first it just takes a little more effort to find the perfect fabric.  It is important to make sure the paint color coordinates well with your cabinetry.  If your cabinets are white then it makes sense to paint the walls with color in order for the cabinets to pop out and not just blend into the walls.  Paint color for a kitchen with wood cabinetry can be tricky.  The paint color on the walls should be a color that enhances the cabinetry.  The wrong yellow can make your cabinets look orange or drab.  Sometimes selecting one of the lighter or darker shades that exists within the wood creates a cohesive monochromatic color scheme.  Or pull a color from your counter top.  Putting test swatches of color on the wall in different locations can help identify the best color for your kitchen.


Once the fabric and paint have been selected it is time to move on to artwork.  This can include paintings or prints on the walls, as well as, dishes, baskets or vases around the room.  Plants also add an organic element (silk or real).  Mix things up, put decorative plates on the wall or rustic wood pieces in a modern kitchen.  Pops of color with these accents can add dimension and interest to your kitchen.

If you have any questions please comment below or contact me on my Facebook Fan Page at Facebook.com/dottywymandesigns. I would love the hear from you. I look forward to writing about more ideas for your custom kitchen.

Dotty Wyman is the principal designer at www.dottywymandesigns.com.

Wednesday, September 22, 2010

Kitchen makeover on a budget - lighting

This is part IV of how to beautify your kitchen on a budget.  Lighting is an extremely important part of any remodeling project, especially in the kitchen.  Lighting is not only needed for cooking and eating, but it also creates the mood in the kitchen.  Kitchens today function as the workplace for the family, as well as, a primary room for entertaining.  Lighting adds dimension to surfaces such as the cabinetry, counter tops and decorative accents.  Updating the lighting in your remodeled kitchen can create a more dramatic change to the room.

Under Cabinet Lighting
 There are three primary layers of lighting within the kitchen space; under cabinet lighting, recessed light and decorative lighting.  When you are doing a kitchen remodel adding all of the light layers is ideal, but having two of the three can work well too.  Under cabinet lighting works well for tasks done on the counter tops, because the light is close to where the work is being executed.  Recessed lights should be place around the kitchen to accentuate the cabinetry and any artwork.  Both the under counter and recessed lights can have dimmers in order to act as accent lighting.  Decorative lights are usually the pendant lights over an island or peninsula, or a chandelier over the dining table.  These lights will have a finish that works with the other hardware in the kitchen such as cabinet pulls or appliances.  These fixtures help to carry through the decorative style of the kitchen whether it is traditional or contemporary.  Again dimmers on these fixtures give you more flexibilty for their use, which is important if you are not able to apply all three layers of lighting in your kitchen.


Recessed Lighting

The best time to add or change lighting fixtures occurrs when a repair is being done to the ceiling or counter backsplash.  When these surfaces are exposed electricians are able to more easily install light fixtures without damaging plaster and  tile.  Don't miss an opportunity to add lighting, even if the kitchen remodel is a year or so down the road.


Overall look for kitchen

If you have any questions please comment below or contact me on my Facebook Fan Page at Facebook.com/dottywymandesigns. I would love the hear from you. I look forward to writing about more ideas for your custom kitchen.
Dotty Wyman is the principal designer at www.dottywymandesigns.com.

Tuesday, September 21, 2010

Kitchen makeover on a budget - flooring

Go from this...
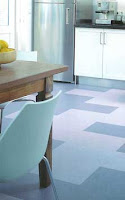
This is part III of how to beautify your kitchen on a budget.  The flooring you choose can make a big impact in the feeling of your kitchen, since it is one of the largest surfaces in the room.   This may not be the first thing you notice when you walk into a room, but it adds important support to all the beautiful focal points in your kitchen such as the cabinetry, counter tops, and artwork


to custom vinyl.
The most popular flooring options are tile, hardwood and vinyl.  Hardwood floors usually have a warm neutral color and texture.  They blend well with both contemporary and traditional designs.  Hardwood is easier on your legs, hides dirt and is durable.  If you already have wood flooring, but the floor is looking a little warn, then you may want to have them buffed and add a new coat of polyuraethane. This is your most economical option.  Floors that are more heavily damaged may need to be sanded down to the bare wood.  This allows you the opportunity to stain the wood floors a new color prior to applying the 2-3 new coats of polyurethane.  Tile floors are extremely popular, because of their durability and wide range of colors and styles.  If the existing tile floor in your kitchen is a neutral color and you are not changing the layout of your kitchen, then you may consider leaving the floor in place.  You may want a professional cleaner to get any grime off the tiles and out of the grout lines.  Finally, vinyl flooring is the most economical option.  It can be purchased in sheets or tiles.  Both are durable and can withstand heavy use in a kitchen.  The tiles allow you to be creative by mixing patterns and colors.
 
to hardwood.

to tile.
If you have any questions please commnet below or contact me on my Facebook Fan Page at Facebook.com/dottywymandesigns. I would love the hear from you. I look forward to writing about more ideas for your custom kitchen.

Dotty Wyman is the principal designer at www.dottywymandesigns.com.

Monday, September 20, 2010

kitchen makeover on a budget - counters and tile

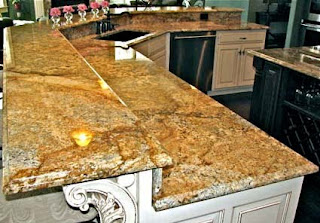
This is part II of how to beautify your kitchen on a budget.  I will be focusing on counter tops and backsplash options.  Many times kitchen cabinets are in good shape, but the kitchen needs an upgrade or a change.  An excellent way to add glamour and value to your kitchen is to add natural stone, solid surface or butcher block as your counter top and tile to the backsplash. Upgrading the surfaces in your kitchen can make an ordinary builder kitchen take on a custom designed look.


Granite counter top

Natural stone, such as granite, marble or sandstone are beautiful and they add an organic element to a kitchen.  Granite is the most popular, because of its durability and the varied colors that are available.  Marble and sandstone have unique looks, but are more porous and suseptible to staining.  I don't think that means you shouldn't use them.  It means you should place them where there isn't as much wear and tear.  The final option is butcher block, this wood surface will add warmth and richness to a kitchen.  The best use would be to mix the butcher block with another more durable counter top surface.  Possibly saving the butcher block for a breakfast island or pantry area.  Another money saving option is to put the pricery counter tops where it is most visible.  For example, placing granite on the center island and using a neutral formica on the remaining counter top around the kitchen.  All  the attention is drawn to the island and the surrounding counters become less important.


Butcher Block Island


Solid surface counters are another sleek alternative to natural stone or wood.  They are made of ground quartz mixed with a resin.  It can be created into many colors and the counter is more uniform in color and design.  Colors vary from bright solid red to natural stone looks.  The material is durable and requires little maintenance.


Once the counter top has been selected a tile backsplash adds detail and interest to your kitchen.  There are many tile options in varying price ranges to suit your budget.  It is also an opportunity to add decorative tiles or interesting patterns and designs.  It is important to get samples of your counter top and tile selections and try them out at home.  Colors can appear very different at home than in the showroom.  Make your decision with all the elements sitting next to each other to ensure a cohesive decision.
  
Decorative tile backsplash
If you have any questions please comment below or contact me on my Facebook Fan Page at Facebook.com/dottywymandesigns. I would love the hear from you. I look forward to writing about more ideas for your custom kitchen.

Dotty Wyman is the principal designer at www.dottywymandesigns.com.

Friday, September 17, 2010

kitchen makeover on a budget

Is your kitchen looking dated or doesn't reflect your current style? There are many ways to update your kitchen without ripping everything out and starting from scratch. Over the next several blogs I will provide some budget friendly ideas and insight for updating your kitchen. I will provide options for the cabinetry, counter tops, back splash, lighting, floors, appliances and decorative accents. The first area I will cover is kitchen cabinetry.


Many times clients want to remove their outdated cabinetry even though it is still in good condition.  They either don't like the color, wood grain or want to add decorative molding to the top or bottom of the cabinets.  Their structurally sound cabinets can now be the base for a dramatic new look to their kitchen.  By adding crown molding to the upper cabinets, base molding to the lower cabinets and decorative molding to the sides of plain cabinet boxes, you can easily transform your kitchen cabinetry.  Carpenters are even able to add feet to the lower cabinets to show like the latest kitchens in magazines.  Once all of the decorative woodwork has been added the painted finish can be applied to make it all uniform and enhance the newly added details.


 A carpenter can also improve how seamlessly your appliances fit into spaces and fix unsightly problems. Many times the space for the refrigerator is too big. There are gaps around the sides and the top and it keeps the kitchen from looking seamless and custom. These spaces can be built up and filled in with moldings. Another idea is to build in your microwave. A microwave sitting on the counter also doesn't have that new custom look, most are built into a cabinet. Another way to beautify your cabinetry is to fix corners that have cracked or side panels that have discolored from floor cleaner. These are small, but important details that can be corrected with the addition of trims, moldings and paint.


Finally, the paint finish. There are endless combinations of paint colors and glazes that can be used to create the exact finish you desire. You are able to create a traditional white glazed finish or a contemporary look with a bold color. The painted finish works to enhance the architectural details that have been added. Once you have transformed your existing cabinets with trim and paint, friends and family will not believe the cabinets aren't new.
If you have any questions please comment below or contact me on my Facebook Fan Page at Facebook.com/dottywymandesigns. I would love to hear from you. I look forward to writing about more ideas for your custom kitchen.


Dotty Wyman is the principal designer at www.dottywymandesigns.com.